空痕博客 - 编程学习分享
推荐文章
-
推荐 
-
推荐
夸克网盘python sdk库
 1年前
1年前
-
推荐


最新发布
-
移植 Material Design 3 色彩系统的 UTS 插件(uniapp/uniappx) Material Design 3(简称 M3)是 Google 推出的最新设计语言,它提供了更加动态和个性化的色彩系统,帮助开发者构建美观且一致的用户界面。kh-material-color专为 uniapp UTS 插件开发的 Material Design 3 色彩系统移植版本。支持 uniapp、uniappx。 官方 Material Design 3 色彩系统文档:https://m3.material.io/styles/color/ 插件功能 在跨平台开发中,保持设计一致性是一项挑战。Uniapp 作为流行的跨端框架,结合 UTS 插件系统,为开发者提供了强大的原生扩展能力。kh-material-color 功能为将 Material Design 3 的色彩系统无缝集成到 uniapp 项目中,让你能够轻松应用 M3 的动态色彩方案,无论是浅色模式还是深色模式。 主要特性 完整的 M3 色彩支持:基于官方规范,提供所有核心色彩角色。 动态色彩生成:通过种子颜色自动生成协调的色彩方案。 深色/浅色模式支持:一键切换,适配不同主题需求。 简单易用的 API:几行代码即可集成到现有项目。 类型安全:使用 TypeScript 定义,提供完整的类型提示。 支持的颜色方案 kh-material-color 插件导出了 MaterialScheme 类型,包含了 Material Design 3 中的所有关键色彩角色。以下是完整的色彩映射: export type MaterialScheme = { primary: string onPrimary: string primaryContainer: string onPrimaryContainer: string secondary: string onSecondary: string secondaryContainer: string onSecondaryContainer: string tertiary: string onTertiary: string tertiaryContainer: string onTertiaryContainer: string error: string onError: string errorContainer: string onErrorContainer: string background: string onBackground: string surface: string onSurface: string surfaceVariant: string onSurfaceVariant: string surfaceContainerHighest: string surfaceContainerHigh: string surfaceContainer: string surfaceContainerLow: string surfaceContainerLowest: string inverseSurface: string inverseOnSurface: string surfaceTint: string surfaceTintColor: string outline: string outlineVariant: string }这些色彩角色覆盖了界面中的所有元素,从主要按钮到背景、表面和轮廓,确保设计的一致性。 颜色演示 浅色模式深色模式颜色演示1图片颜色演示2图片快速开始 步骤 1:安装插件 kh-material-color 点击链接,进入插件市场直接导入安装。 步骤 2:引入插件 在需要使用色彩方案的页面或组件中,导入 generateMaterialScheme 函数: import { generateMaterialScheme } from '@/uni_modules/kh-material'步骤 3:设置种子颜色和主题模式 定义种子颜色和主题模式(浅色或深色)。种子颜色是生成整个色彩方案的基础: // 设置 Material Design 颜色方案的种子颜色 const seedColor = ref('#6750A4') // 默认 Material Design 紫色 // 是否为暗色模式 const isDark = ref(false) // 默认浅色模式步骤 4:生成色彩方案 使用 generateMaterialScheme 函数生成色彩方案。你可以将其包装在计算属性中以实现响应式更新: // 生成 Material Design 颜色方案 const materialScheme = generateMaterialScheme({ seedColor: seedColor.value, isDark: isDark.value }) // 或者,动态计算 Material Design 颜色方案 const scheme = computed(() => { return generateMaterialScheme({ seedColor: seedColor.value, isDark: isDark.value }) })参数说明 参数可空说明seedColor是种子颜色,用于生成整个色彩方案。默认值为 #6750A4(Material Design 标准紫色)。isDark是是否为暗色模式。默认值为 false(浅色模式)。步骤 5:在模板中使用色彩方案 在模板中,你可以直接通过点操作符或下标访问色彩角色: <template> <view class="container"> <!-- 使用点操作符访问 --> <view class="surface-box" :style="{ backgroundColor: scheme.surface }" > <text :style="{ color: scheme.onSurface }"> 这是一个表面容器 </text> </view> <!-- 或者使用下标访问 --> <view class="primary-box" :style="{ backgroundColor: scheme['primaryContainer'] }" > <text :style="{ color: scheme['onPrimaryContainer'] }"> 主要内容 </text> </view> <!-- 动态切换深色/浅色模式示例 --> <button @click="toggleTheme">切换主题</button> </view> </template>脚本部分: <script setup> import { ref, computed } from 'vue' import { generateMaterialScheme } from '@/uni_modules/kh-material' const seedColor = ref('#6750A4') const isDark = ref(false) const scheme = computed(() => { return generateMaterialScheme({ seedColor: seedColor.value, isDark: isDark.value }) }) const toggleTheme = () => { isDark.value = !isDark.value } </script>总结 kh-material-color 插件为 uniapp/uniappx 开发者提供了一个强大而灵活的工具,以遵循 Material Design 3 规范的方式管理应用色彩。通过简单的 API,你可以快速生成动态色彩方案,并轻松适应深色和浅色模式。 无论你是构建全新的应用,还是希望将现有项目升级到 Material Design 3,这个插件都能节省大量时间,并确保设计的一致性。 如果你有任何问题或反馈,欢迎在博客或插件市场留言。 支持与赞赏 如果你觉得本插件解决了你的问题,可以考虑支持作者: 支付宝赞助微信赞助支付宝赞助图片微信赞助图片相关链接 Material Design 3 官方文档 Uniapp 官网 UTS 插件开发文档
-
-
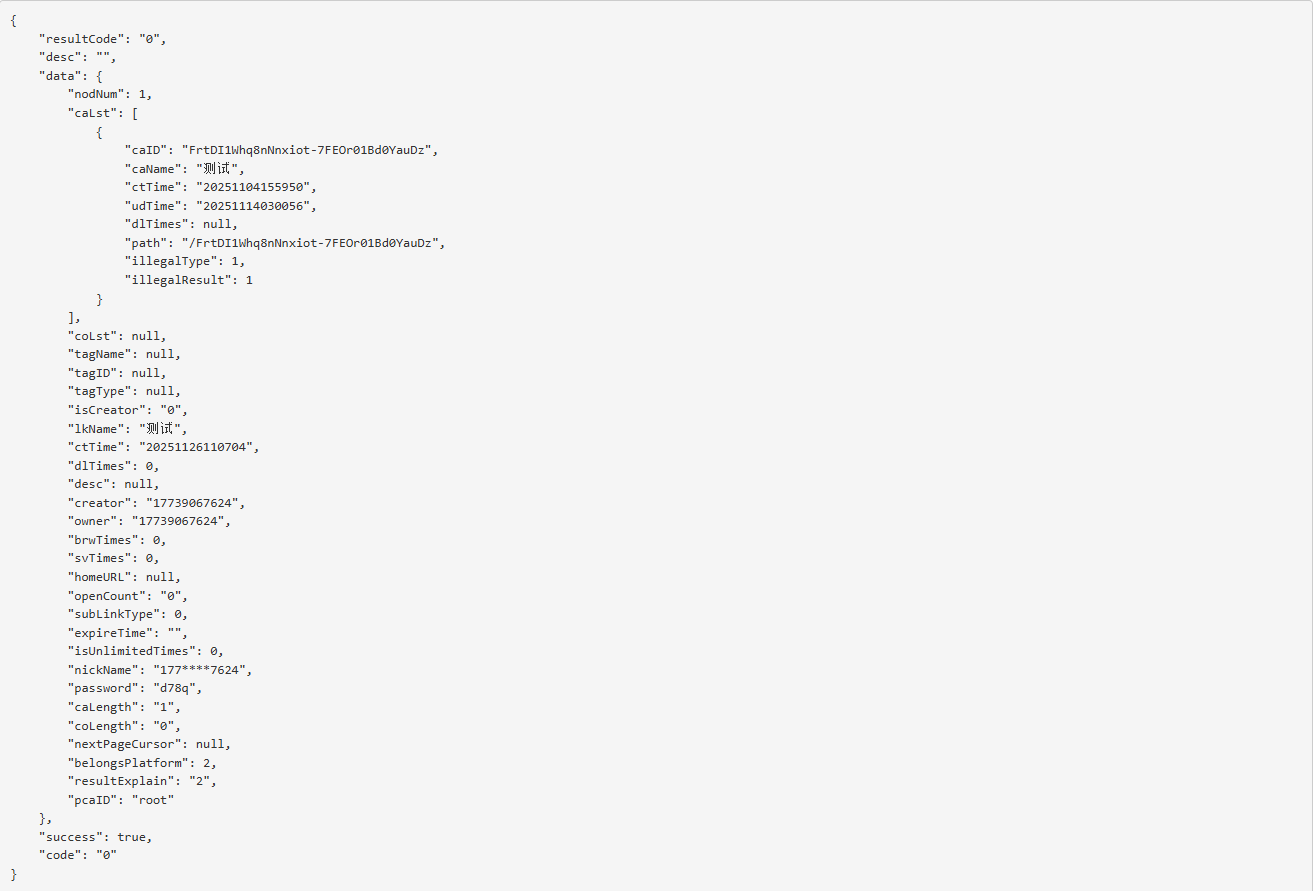
移动云盘分享的链接信息获取接口请求体/响应体加密及解密 实现目的 有没有过这样的体验?手里攥着几十上百个网盘分享链接,要一个个点进页面、手动确认转存到自己的网盘——重复的操作像流水线作业,不仅浪费时间,而且还可能会漏掉文件。所以搞个自动转存脚本是非常有必要的。 打开分享链接->点击F12->查看网络,$[阿鲁表情]::(哭泣) 网盘的分享链接数据居然全是加密的。观察了一下加密字符好像是base64,直接一手解码,乱码!!!作为一个对逆向工程一窍不通的开发者,这已经超出了我的能力范围。 既然自己搞不定,不如试试“AI”。刚好试试最近热门的Gork.我把收集到的几条请求体、响应体密文整理好,清晰标注了获取场景,然后一股脑发给了Gork。 让我惊喜的是,Gork不仅精准识别出这些密文来自哪个网盘站点,还直接给出了对应的加密算法类型。我拿着密钥代入算法解密,结果发现解密失败$[阿鲁表情]::(中指)。 我只能继续问Gork,让它提供判断加密算法和密钥的参考来源。好在Gork很配合,直接给出了几个链接,包含GitHub及CSDN的链接。将几个站点都查看了一遍,选择了最简单的,文件名清晰且代码精简。 经过测试,解密可以使用,但是加密报错。将问题再扔给Gork,修复了即便终于给了我可以使用的代码,自己再整合一下就完成了转存分享中最难的部分$[阿鲁表情]::(得意)。 演示链接 链接: https://yun.139.com/shareweb/#/w/i/2qidG1XEkUKi0 提取码:d78q 复制内容打开中国移动云盘手机APP,操作更方便哦 解密解密分析 项目说明算法AES-128-CBC + PKCS7 填充密钥"PVGDwmcvfs1uV3d1"(UTF-8 编码)IV随机,前 16 字节拼接在密文前密文Base64 解码后第 17 字节起编码整体 Base64(标准,无 URL-safe)加解密代码 需要安装crypto-js库 const CryptoJS = require("crypto-js"); // 新版外链接口固定密钥 const FIXED_KEY = "PVGDwmcvfs1uV3d1"; /** * 移动云盘新版外链加密(OutLink) * @param {string} plaintextJson 明文JSON字符串 * @returns {string} 最终的Base64密文(和官方App一模一样) */ function encryptOutLink(plaintextJson) { // 1. 生成随机IV(16字节) const iv = CryptoJS.lib.WordArray.random(16); // 2. AES-128-CBC 加密 const encrypted = CryptoJS.AES.encrypt( plaintextJson, CryptoJS.enc.Utf8.parse(FIXED_KEY), { iv: iv, mode: CryptoJS.mode.CBC, padding: CryptoJS.pad.Pkcs7 } ); // 3. 把 IV(16字节) + 密文 拼接起来 const ivAndCiphertext = iv.concat(encrypted.ciphertext); // 4. 整体转Base64 → 这就是最终发出去的字符串 return ivAndCiphertext.toString(CryptoJS.enc.Base64); } /** * 解密移动云盘新版外链(OutLink) * @param {string} encryptedBase64 响应体的 Base64 字符串(可能带空格) * @returns {string} 解密后的明文 JSON */ function decryptOutLink(encryptedBase64) { try { // 1. 清理 Base64 const cleanB64 = encryptedBase64.replace(/\s+/g, '');; // 2. Base64 解码 → WordArray const combined = CryptoJS.enc.Base64.parse(cleanB64); const totalLength = combined.sigBytes; // 总字节数 // 3. 提取 IV(前 16 字节 = 4 words)和密文(剩余) const ivBytes = combined.sigBytes / 4; // 每个 word 4 字节 const iv = CryptoJS.lib.WordArray.create(combined.words.slice(0, 4)); // 前 16 字节 const ciphertext = CryptoJS.lib.WordArray.create( combined.words.slice(4), totalLength - 16 // 剩余长度 ); // 4. AES-128-CBC 解密 const decrypted = CryptoJS.AES.decrypt( { ciphertext: ciphertext }, CryptoJS.enc.Utf8.parse(FIXED_KEY), { iv: iv, mode: CryptoJS.mode.CBC, padding: CryptoJS.pad.Pkcs7 } ); // 5. 转 UTF-8 字符串(JSON) const plaintext = decrypted.toString(CryptoJS.enc.Utf8); if (!plaintext) { throw new Error("解密为空,可能是填充错误或密钥不对"); } return plaintext; } catch (error) { throw new Error(`解密失败: ${error.message}`); } } // 测试 // getOutLinkGeneral 请求体加密 const test1 = JSON.stringify({ getOutLinkGeneralReq: { linkID: "2qidFfUiXYAas", isPasswd: 1 } }); const res1 = encryptOutLink(test1); console.log("getOutLinkGeneral 请求体加密结果:", res1); console.log("getOutLinkGeneral 请求体解密结果:", decryptOutLink(res1)); // getOutLinkInfoV6 请求体加密 const test2 = JSON.stringify({ getOutLinkInfoReq: { account: "", linkID: "2qidG1XEkUKi0", passwd: "d78q", caSrt: 0, coSrt: 0, srtDr: 1, bNum: 1, pCaID: "root", eNum: 200 } }); const res2 = encryptOutLink(test2); console.log("getOutLinkInfoV6 请求体加密结果:", res2); console.log("getOutLinkInfoV6 请求体解密结果:", decryptOutLink(res2)); // getOutLinkGeneral 响应体解密 const test3 = `hRjMTT8wrhtJl02pwyDUgIeu0Z0HwkeCwsmjBdRHh4a9icP28Hh1SI37Fe804vEHgVkj+vAUz/bPbd6b2vh6VON0tZ3RRD4KmuaF7fU3b28U1LuRrZR+qyNfe4HWYStn/LPK4llYjQLbNaAF6cX1aArQm7OvmvOJhOttJZkfp5/Nvm1ldV6+kZYwAyNA7uQkcVqxWzyEVcNZOXYFCLAqkkJKOZd2K8ZJJ7M3ZiL4Gr9hfIdYaKiuUS2p4v0v6hC/G2TdTEezdzL+N2Is+fJJs2X6UXzjO/7 UwxWtP4Hv/pCMX76RNJzMKXRUcSws6yb13doXSRBV00X2wMRwLS4xPwjG6EFX2NwEiI6R67fiPCkQlwfzLZR7thoASJFIltN9tLavTqWhVq59U82beRqq0mLunRNh1FWtHRTpTmJyzZFCFD93nHCcEX9NBgmRBjzoZm+SwWTv2wjOH9eLX2G2qfxxsr+TTP6+q4QrDjShKBljVligi2W2gPcbgFb19obn4rK96nRX7tMyEcLY6vD7zFlMi8IZpSMLSxnXEcdcHix/LNa/yOoLUe1VhMyWDb6bgpDl1/IlgPMY/AAUPV7TAXeIN/T+A2Vw65t3tj+43 i6qYFBWQMfCax9MftQJl/ttOqBZPTbDbT203UdVD95LDbFGysOUlduEdJHrSb8Vmfd+wgRJZWhNoLnGD8lFtjYeD9QW1RZRy9j7kgpbp8G3MZITbW2Rfbe3BpWgBHdX76YbEdk8AVfyIInBkR8t73blVnut2hDDWnskYBJ18HHdo1M0w3wGMoeXMVfk+iDIlRfrxeNBF4m2SeJLuwz91WdrM9vaL5rSBIwJ9OLpGX1a0s4Ts9zv87HW2GbbcaSv8m8UFroo6g9nQ/cn5ohX6rBBIDqJo+eNpkdr/SQYmZzgzNXjLXCP8GRY3EMMbyutDBU60DiAM71Xn/h/lAMie4bS+jKVXo/TWban+oIBtT9jCNgAg3tWHZ7FxXuGf2h3EVboc+RmxCSSFtf/RS21uiCtFQgFlt0xATBgYxNBSL9OyG8+HyuVgTLu20xHLebDBy/c8PLdzYrxlE8W3SzE/LWnbjWeUTMdfRzDJ+hWMlVEAtn2hT1z/yIkhFlRk796uERfIHdSiL3Ik8IXLi4D395FyUCpstTO60qSAkgl+F7KPZW5dECZAcMmI6YvkQLRfqCUYxV19IXnPjjlS7Zdy8h/VqnQuL/euOv+tJxSn8TxpvftXwmZxSDeJWz94VEhl6xHwVIte4endaZLTREQA16UJkE1kb7Tfv9IQTSWmXZ6W21yfivlzmMtHHfRTtBBkQJq0GY/H3q6cUJbMEbcyZ1hynOHMBHheYf6DoLTP4Hg3nuzVaLYhkgl7wIbwhW6uELsCnn1t1co8r5phGFuil7mCXTNgL07KlyoCCGLNtAQRWFjZ/UXrLcqd4MQIHCXh1uYQQq9xFRDwg9SjDE90rsVtQqBW2WzKa8AvyruB6tboRJNHygmbAKuiV3HUa8OiPd4UOqEhmBxK1uVcUTJxbc9arFxkUQoxSYyMjSdpqJJa3Gx4UudCUFDRdYKJowV8/7 vsaRwxyMbyjBnhGguL6ZHL3mLNgGFklJOTtpQ9gJBZHngZRzxJnm6bI59tCrOSqs2Avmh4HpRyrFZNpnAb/aVr2qMOzHYp+o/ADuTb7dxN9zoYDNG8Vz1u+fdfUGFGSYw1RkjvMpmrfzO7XWa9bflc+eLoxxNzg5bOMcfeKv8DYrD7z2yf6WiYH2VLG8RCjEuHWF2laU1YWUk/cVGPUW2ndCa69LcAn33zbWeK7o7LtuPl/IwmQ6v8jV2o4vlkQaj6cmN7fHnm/LrgGV8nE588x5PiohvoYypix7hmFeiNmt/papf003qMJMeEBEr2MhR5IqA8Xt74FECoP2JjCHxzmsfllP0XQ+0 KWM1fWKR9AWNMscrgaMLeI42MSgXfzwZeJ7tK4uPBmpIOH8Z4CWUVfjxV1v+k3kF9W7cHWPqgESUv76/8 KSR6ZkZN0STpuOY20iCVJvdxyklrlHH7lsCrAJVrTptGsfMdJOJEBLfxkZbi6by6F3yOz0/RSflnkyyCYodTcq7mb7jY4ygO+XryI5b738aBTHrBX7pcFYZ2GXedPKsexVnzbI2OX2vFdneroVIUgkBIw0caA86cp9m43Fg+hTl3MPpx8Ov5pzgSlOhFxI94NlL6WLa2FHKJEcmSavtuy5SQ4qoho21qKsSv5F+JAtzSS+NI6FLnPJAl06n2xPRyB5XxkA2vfPrwaSgfEEYzDycj/XETvi3GubhV0JmciSKStFgJfN6rm6+OZH3n0CcUttLrQ5j2tbdoC8KjhEQx1wuQaBCm7BtxQXD`; const res3 = decryptOutLink(test3); console.log("getOutLinkGeneral 响应体解密结果:", res3); console.log("getOutLinkGeneral 响应体加密结果:", encryptOutLink(res3)); // getOutLinkInfoV6 响应体解密 const text4 = "q1FepUXZdRCJESkrGVyAkMsyT+9 NJNaPxqtbSHUvoMsRyKS2Ju2Ed8nQR/XmD9c1hlRRRpMtR++bsEbNRKL6Z9dvrqioStjUN3Cfi41ANo8YDbXvqvVfIosSGWym73S7+UxadvzDsLFwx6sgAOxMWhoyY2Lkcmt9YkI6oNAYmf5AZUgUhl/oSuXg4PJYOk1MimRv5etgqpTvwMQwQHRsZt4FPOlSLq6bL3R721PUQ3049/UBrom92I0FYGQJ6kjP1I7fRrC1yj2RPiqtVTOv3dsldvtaDj0j9dxkMhBiW3kwzN4cAMld60Q3llLEuaNcwmMANNeKjaeyEpXUUgtDgEIrL9+kSC/Qpkll3rh27uF3lUG4eLB5Ij0a6ABG+zHSau3gGM8/vrFWKOigdAlq2zMaa/Zp3hIp2rBEAKRt+YIR4hC9BnlxrP8d9Wm7vJB/EGWWiHb2kkiULpI5DFToX1w/8 jSvr3XuGtg9JopuRbK4Z6HJYRaJ9D+45 yHyYurSucqzakgDJER1WpfM3UZNcBvD2xgkbUb0vUdiVCvqz1E+/0I+OEzVb3p/w6ARI3SHENQGLTvdCkpW9HmAIWDwz8ONl6v2/8 yqAZFVpwJYmfqrYjUyWXmZZwsoNBgE5fg+SE2nkb90I7frKqRNiRfu7+V0NuL5T/dHHCaEXxuVxR3dm7h9hDmh/9 fnTWBTSIld4sKBmQY8wJNDziy0guKNOVO1TpSAcCWXUcpc913s1ycVWPY6eGfohZUrMu0C3WmuxGQEVHD3EPaU17fBCmxaGLm5SqaNY/g+P0kGNw0SZFybo/K6rk3c24M2zrSR6YiN2TGc+9 YpDDnV0PUH0vfcgThw8EPpmx0pJ4AgfqsbxYXOwo3OpMkiVZWjkfUj2yZiRypd+RybH7iJpd141kp8Y+H4r/o47GJ8D72D74f3AI25lJz0jtdnRE/UHJR9VAIRL9gTYVIxupObrJUcXbVEZ1sCEVx9NyZssoUiaTwDNazaLqHnmelCaqoetNEdWIt8" const res4 = decryptOutLink(text4); console.log("getOutLinkInfoV6 响应体解密结果:", res4); console.log("getOutLinkInfoV6 响应体加密结果:", encryptOutLink(res4)); 参考内容 139cloudsecret
-
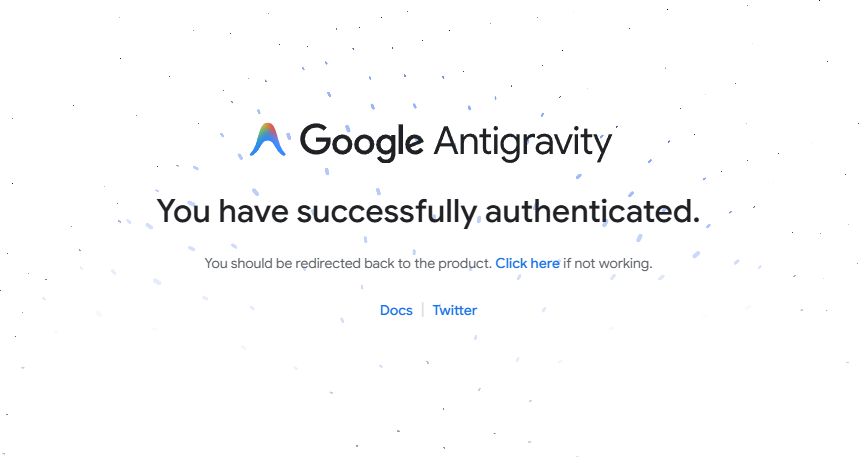
解决三个导致 Google Antigravity 无法登录的问题 问题1:网页显示登录成功,IDE无反应 问题描述: 启动IDE后,在使用谷歌登录界面,点击登录按钮,在网页中登录成功后,IDE无反应。 网页登录成功图片 问题原因: 代理未开启TUN模式。 解决方法: 开启TUN模式。 解决教程(以Clash为例): 启动Clash; 进入General页面(默认首页); General页面图片 点击TUN Mode后方的开启按钮; 点击install安装; 等待Clash重启; 重新启动Antigravity即可; 常见问题 修改后依旧不行? 点击登录成功后网页中的Click here,在Antigravity中稍微等待几秒。 切换节点。 点击Click here图片 问题2:卡顿在“Setting up your account” 解决方法: 与问题1的解决方法相同。依旧不可以则切换节点。 问题3:地区不支持 问题描述: 登陆后提示: Your current account is not eligible for Antigravity, because it is not currently available in your location. Your current account is not eligible for Antigravity. Try signing in with another personal Google account. 账户地区不支持图片 问题原因: 谷歌账号地区不在支持的范围内: 常见不支持:中国大陆、香港 常见支持:美国、日本 查看支持的地区:点击查看 查看你的账户所属地区:点击查看 解决方法: 修改账户关联地区为支持的地区,建议修改为美国或日本。使用谷歌账号所在地区的节点。 亲测日本可以。 解决教程: 打开谷歌账号关联地区更改请求:https://policies.google.com/country-association-form 地区选择日本或其他 原因选择我的工作地/学习地和居住地分属不同的地区或其他,不要选择我经常使用虚拟专用网 (VPN) 修改示例图片 点击提交即可 等待几个小时就能修改成功(会收到谷歌邮箱邮件通知)。 重启Antigravity登录即可。 修改关联地区成功邮件通知图片 快捷链接: Google Antigravity下载 参考文章: 解决Google Antigravity 登录不了的问题 Google Antigravity 无法登录问题的解决方法
-
移动云盘 Python 库使用文档 1. 配置与初始化 初始化 Yun139 会话: from Yun139 import Yun139Session # token要求为移除Basic 前缀的token Yun139Session = Yun139Session(token="你的Token")2. 刷新 Token # 刷新token status, result = Yun139Session.refresh_token() # 说明: # 1. 刷新token后,实例会自动更新token # 2. token有效期小于15天才可以刷新3. 文件管理 3.1 创建文件管理实例 from Yun139 import Yun139FileManager yun139_file = Yun139FileManager(session=Yun139Session)3.2 移动文件/文件夹 status, result = yun139_file.move_file( src_fids=["文件ID1", "文件ID2"], dst_pdir_fid="目标文件夹ID" ) # 返回示例 # True {"taskId": "1813463306615229568"} # 说明:获取任务ID后,可通过查询任务状态接口查询任务执行结果3.3 重命名文件/文件夹 status, result = yun139_file.rename_file( fid="文件ID", new_name="新文件名.png" ) # 返回示例 # True { # "success": true, # "code": "0000", # "message": "请求成功", # "data": { # "fileId": "FjyKEUGVXXmeU1zaXq1xO1JzHSVgVV0zn", # "parentFileId": "FrtDI1Whq8nNnxiot-7FEOr01Bd0YauDz", # "name": "2.png", # ... # } # }3.4 删除文件/文件夹 status, result = yun139_file.remove_file(fids=["文件ID1", "文件ID2"]) # 返回示例 # True { # "taskId": "1813468597285129984", # "batchFileResults": null # }4. 文件夹管理 4.1 创建文件夹管理实例 from Yun139 import Yun139FolderManager yun139_folder = Yun139FolderManager(session=Yun139Session)4.2 创建文件夹 status, result = yun139_folder.create_folder( folder_name="创建文件夹测试", pdir_fid="/" ) # 返回示例 # True { # "parentFileId": "/", # "fileId": "Fqkd1QUxDEyTTkHUC5mdPNrmiuEk8QwGk", # "type": "folder", # "fileName": "创建文件夹测试", # ... # }4.3 获取文件列表 # 第一页 status, result = yun139_folder.get_lists( pdir_fid="文件夹ID", size=50, cursor=None, sort_by="file_name", sort_order="asc" ) # 第二页 status, result = yun139_folder.get_lists( pdir_fid="文件夹ID", size=50, cursor="0|[57-0-0,12-0-1][JzlYdEZEWk8zMEZ0UjlaRjdIM0ZxLUc3MFpWMzBaZEhfYWUxVU1laUhicHlXYnRWLSc=,J0ZpcUlmVDFyNUlGRHc4MHhSenkxRzVwbEgwa2NxLVRMUSc=]", sort_by="file_name", sort_order="asc" ) # 參數説明 # cursor:首页为None,还有文件的话会返回nextPageCursor # 返回示例 # True { # "items": [ # { # "fileId": "Fiy3GykVcP9lxL8gNU1VJupjIC8I1XC1Z", # "parentFileId": "Fn_WtHq4W6j7l6Vvh1zZI1YwQYBbeFvi-", # "name": "跳转浏览器打开.jpg", # ... # } # ], # "nextPageCursor": null # }5. 分享链接管理 5.1 创建分享链接实例 from Yun139 import Yun139ShareManager yun139_share = Yun139ShareManager(session=Yun139Session)5.2 创建分享链接 status, result = yun139_share.create_share( title="分享7天测试", url_type=0, fid_list=["文件ID1"], fld_list=["文件夹ID1"], expired_time=7 ) # 返回示例 # True { # "result": { # "resultCode": "0", # "resultDesc": "" # }, # "getOutLinkRes": { # "getOutLinkResSet": [ # { # "objID": "aab3b2f8d00e491da36b466052d94a5a", # "passwd": "q9su", # "linkID": "2qidFfUiQDtnx", # "linkUrl": "https://yun.139.com/shareweb/#/w/i/2qidFfUiQDtnx", # "linkUrlMin": null # } # ] # } # }6. 任务管理 6.1 创建任务管理实例 from Yun139 import Yun139TaskManager yun139_task = Yun139TaskManager(session=Yun139Session)6.2 查询任务状态 status, result = yun139_task.get_task_status(task_id="任务ID") # 返回示例 # True { # "taskInfo": { # "taskId": "1813463306615229568", # "status": "Succeed", # "progress": 100, # "createdAt": "2025-11-07T02:27:52.000+08:00", # "startedAt": "2025-11-07T02:27:52.000+08:00", # "finishedAt": "2025-11-07T02:27:52.000+08:00", # "code": null, # "message": null, # "taskType": 2 # }, # "batchFileResults": [...], # "extraData": { # "totalProcess": 0, # "consumedProcess": 3 # } # }7. 文件上传 7.1 创建上传实例 from Yun139 import Yun139UploadManager yun139_upload = Yun139UploadManager(session=Yun139Session)7.2 上传文件 def progress(percent): print(f"上传进度: {percent}%") status, result = yun139_upload.upload_file( file_name="cc.zip", file_path="cc.zip", pdir_fid="目标文件夹ID", progress_callback=progress ) # 返回示例 # 上传进度: 100% # True { # "fileId": "Fvwh5Wdjb6pl8BXzvEgpGhazttFGo2_gZ", # "parentFileId": "FrtDI1Whq8nNnxiot-7FEOr01Bd0YauDz", # "name": "cc.zip", # "description": null, # "type": "file", # "fileExtension": "zip", # "category": "zip", # "createdAt": "2025-11-07T03:58:36.440+08:00", # "updatedAt": "2025-11-07T03:58:37.561+08:00", # ... # }8. 文件下载 8.1 创建下载实例 from Yun139 import Yun139DownManager yun139_download = Yun139DownManager(session=Yun139Session)8.2 获取下载链接 status, result = yun139_download.get_download_url(fid="文件ID") # 返回示例 # True { # "fileId": "FqRfdx22osqO-tU0ZvV1Nb7ryEM8dqKAj", # "errCode": null, # "message": null, # "url": "https://b22-obs-ykj-01.obs.cidc-rp-2006.joint.cmecloud.cn/...", # "expiration": "2025-11-07T03:20:13.396+08:00", # "size": 32029905, # "cdnUrl": "https://yun.mcloud.139.com:443/cdnv1/20241023/FqF8bFyjxCaPMGZCsjbNHSLngJhZUcQMj.pdf?sign=...", # "cdnSwitch": false, # ... # }9. 打印输出 所有接口返回均为 (status, result),可直接打印: import json print(status, json.dumps(result, ensure_ascii=False, indent=2))10. 其他说明 各接口参数请参考注释及返回示例。 任务型操作(如移动、删除等)返回 taskId 后,可用任务管理接口查询进度。 分享链接创建后会返回链接URL和提取码等信息。 代码下载 cloud_driver_sdk 参考文献 openList