找到
2
篇与
uniapp-x
相关的结果
-
 UTS编写字符串编解码/加密插件(安卓及鸿蒙端) 全局说明 编写说明 uts在安卓端编译为kotlin,所以,使用可以使用安卓自带库+kotlin的方法来实现 uts在鸿蒙端编译为ArkTs,ArkTs和UTS很相似,包括一些方法都一样,所以可以直接从ArkTs的文档里复制代码,稍微修改即可使用。 使用的库 安卓端 import MessageDigest from 'java.security.MessageDigest'; import BigInteger from 'java.math.BigInteger'; import Base64 from 'java.util.Base64'; 鸿蒙端 import util from '@ohos.util'; import { cryptoFramework } from '@kit.CryptoArchitectureKit';插件接口定义 /** * interface.uts * uts插件接口定义文件,按规范定义接口文件可以在HBuilderX中更好的做到语法提示 */ /** * 哈希算法枚举 */ export type HashAlgorithm = | "MD5" | "SHA1" | "SHA224" | "SHA256" | "SHA384" | "SHA512" /** * 哈希加密返回结果 */ export type HashResult = { hash: string } /** * 哈希加密函数定义 */ export type HashFunction = (input: string, algorithm: HashAlgorithm) => string1. Base64编解码 安卓端 /** * BASE64编码方法 * * @param input 输入字符串 * @return BASE64加密后的字符串 */ export const Base64Encode = function (input: string) : string { try { // 将字符串转换为字节数组 // toByteArray()为kotlin的方法 const inputBytes = input.toByteArray(); // 使用Base64编码器进行编码 const encodedBytes = Base64.getEncoder().encodeToString(inputBytes); // 将编码后的字节数组转换为字符串 return encodedBytes; } catch (e) { console.error("BASE64加密错误:", e); return ""; } } /** * BASE64解码方法 * * @param input 输入字符串 * @return BASE64解密后的字符串 */ export const Base64Decode = function (input: string) : string { try { // 将Base64字符串转换为字节数组 const decodedBytes = Base64.getDecoder().decode(input); // 将Java字节数组转换为UTS字符串 return new String(decodedBytes); } catch (e) { console.error("BASE64解密错误:", e); return ""; } } 鸿蒙端 /** * BASE64编码方法 * * @param input 输入字符串 * @return BASE64加密后的字符串 */ export const Base64Encode = function (input: string) : string { let textEncoder = new util.TextEncoder("utf-8"); let uint8Array = textEncoder.encodeInto(input); let base64Helper = new util.Base64Helper(); return base64Helper.encodeToStringSync(uint8Array); } /** * BASE64解码方法 * * @param input 输入字符串 * @return BASE64解密后的字符串 */ export const Base64Decode = function (input: string) : string { let Base64Helper = new util.Base64Helper(); let arr = Base64Helper.decodeSync(input) let textDecoder = util.TextDecoder.create('utf-8'); return textDecoder.decodeToString(arr); } 消息摘要计算 HASH加密使用统一方法,包含MD5、SHA1、SHA224、SHA256、SHA384、SHA512 安卓端 /** * 统一哈希加密方法 * * @param input 输入字符串 * @param algorithm 哈希算法枚举 * @return 哈希加密后的十六进制字符串 */ export const hash : HashFunction = function (input : string, algorithm: HashAlgorithm) : string { try { // 创建MessageDigest实例 const md = MessageDigest.getInstance(algorithm); // 输入数据转化为字节数组 const dataArray = input.toByteArray() // 计算哈希值 const hashBytes = md.digest(dataArray); // 转换为十六进制字符串 const result = BigInteger(1, hashBytes).toString(16) return result; } catch (e) { // 方法出错时返回空字符串 console.error(`${algorithm}加密错误:`, e); return ""; } }鸿蒙端 /** * 统一哈希加密方法 * * @param input 输入字符串 * @param algorithm 哈希算法枚举 * @return 哈希加密后的十六进制字符串 */ export const hash : HashFunction = function (input : string, algorithm: HashAlgorithm) : string { try { // 创建哈希实例 let md = cryptoFramework.createMd(algorithm); // 使用同步方法更新数据 let textEncoder = util.TextEncoder.create('utf-8'); let dataBlob : cryptoFramework.DataBlob = { data: textEncoder.encodeInto(input); }; md.updateSync(dataBlob); // 使用同步方法计算摘要 let mdResult : cryptoFramework.DataBlob = md.digestSync(); // 转换为十六进制字符串 let result = Array.from(mdResult.data).map(byte => byte.toString(16).padStart(2, '0')).join(''); return result; } catch (e) { // 方法出错时返回空字符串 // console.error(`${algorithm}加密错误:`, e); return ""; } }规范调用方法 这里安卓端和鸿蒙端相同 // MD5加密 export const MD5 = function (input: string) : string { return hash(input, 'MD5') } // SHA1加密 export const SHA1 = function (input: string) : string { return hash(input, 'SHA1') } // SHA224加密 export const SHA224 = function (input: string) : string { return hash(input, 'SHA224') } // SHA256加密 export const SHA256 = function (input: string) : string { return hash(input, 'SHA256') } // SHA384加密 export const SHA384 = function (input: string) : string { return hash(input, 'SHA384') } // SHA512加密 export const SHA512 = function (input: string) : string { return hash(input, 'SHA512') }使用方法 import * as KhCrypto from '@/uni_modules/kh-crypto' const input = ref<string>('待加密字符串'); const output = ref<string>('') // base64编码 output.value = KhCrypto.Base64Encode(inputText.value) // base64解码 output.value = KhCrypto.Base64Decode(inputText.value) // MD5加密 output.value = KhCrypto.MD5(inputText.value) // SHA1加密 output.value = KhCrypto.SHA1(inputText.value) // SHA224加密 output.value = KhCrypto.SHA224(inputText.value) // SHA256加密 output.value = KhCrypto.SHA256(inputText.value) // SHA384加密 output.value = KhCrypto.SHA384(inputText.value) // SHA512加密 output.value = KhCrypto.SHA512(inputText.value)插件源码 kh-crypto - DCloud插件市场 参考文档 在uts中如何将字符串转换为ByteArray Base64Helper - 鸿蒙开发API参考 消息摘要计算介绍及算法规格 - 鸿蒙开发指南
-
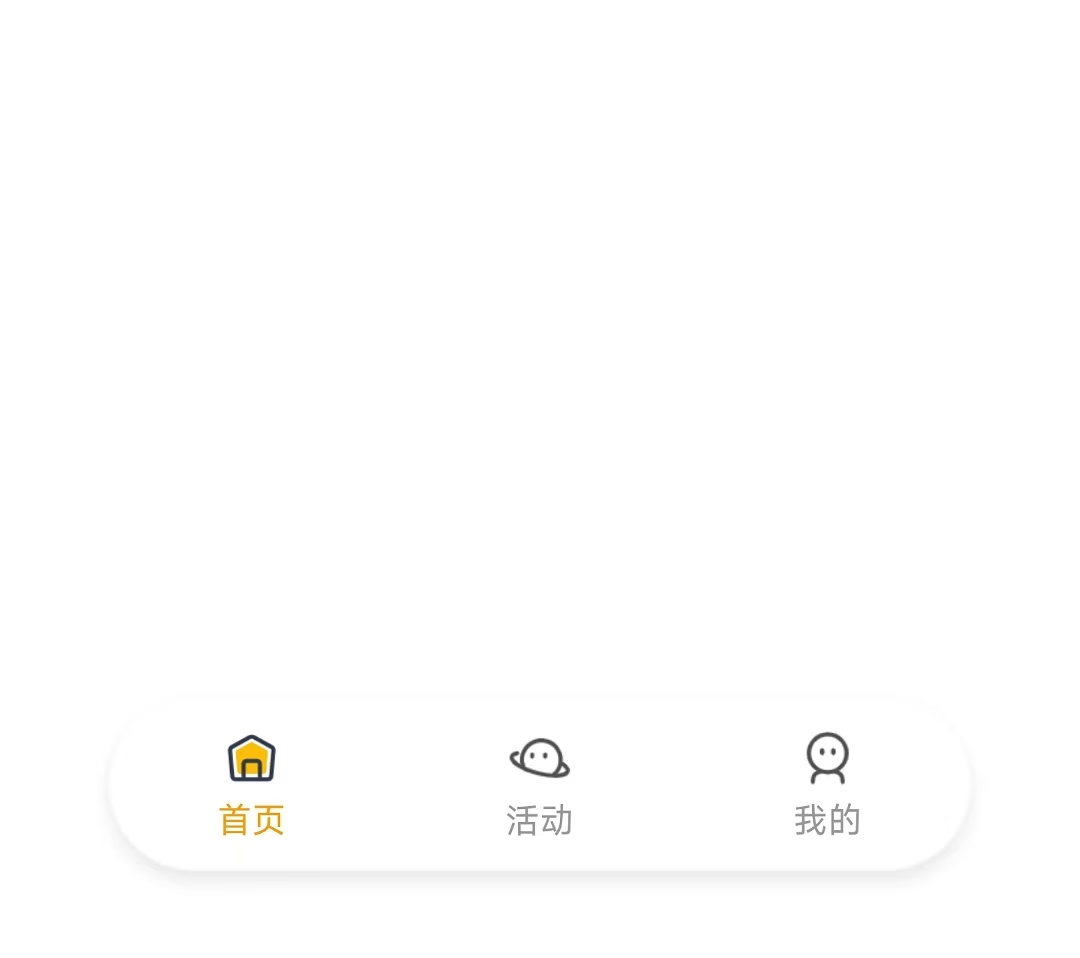
uniapp-x实现自定义tabbar uniapp-x自带导航栏位置固定,且UI无法修改。如果需要适配自己的应用UI及色彩就需要自定义tabbar。 实现说明 将tabbar写入主页面,需要显示的页面作为组件引入。 示例样式 演示示例图片 实现方法 使用swiper实现 说明: 所有页面一次性加载 允许左右滑动 优点:允许滑动切换,用户体验升级 演示代码 <template> <!-- 页面内容区域 --> <swiper style="flex: 1;" :current="selectedIndex" @change="swiperChange"> <swiper-item item-id="index"> <IndexPage></IndexPage> </swiper-item> <swiper-item item-id="more"> <MorePage></MorePage> </swiper-item> <swiper-item item-id="user"> <UserPage></UserPage> </swiper-item> </swiper> <!-- tabber区域 --> <view class="tab-bar-container"> <view v-for="(item, index) in tabList" class="tab-bar-item" @click="switchTab(index)"> <image class="tab-bar-icon" :src="(selectedIndex === index ? item.s_icon : item.icon)"></image> <text class="tab-bar-text" :style="'color:' + (selectedIndex === index ? '#F59E0B' : '#999999') +';'">{{ item.name }}</text> </view> </view> </template> <script setup lang="uts"> // 导入页面 import IndexPage from "./tabbar/index.uvue" import MorePage from "./tabbar/more.uvue" import UserPage from "./tabbar/user.uvue" // tabbar接口类型 type TabInfo = { name : string, icon : string, s_icon : string } // 页面列表 const tabList = reactive<TabInfo[]>([ { name: "首页", icon: "/static/tabbar/home.png", s_icon: "/static/tabbar/home_selected.png" }, { name: "活动", icon: "/static/tabbar/more.png", s_icon: "/static/tabbar/more_selected.png" }, { name: "我的", icon: "/static/tabbar/user.png", s_icon: "/static/tabbar/user_selected.png" } ]) // 选中的页面 const selectedIndex = ref<number>(0) // swiper切换 const swiperChange = (e: UniSwiperChangeEvent) => { let index = e.detail.current if (selectedIndex.value === index) return selectedIndex.value = index } // 页面切换 const switchTab = (index : number) => { if (selectedIndex.value === index) return selectedIndex.value = index } </script> <style lang="scss"> .tab-bar-container { position: fixed; bottom: 60rpx; width: 80%; left: 10%; z-index: 999; display: flex; flex-direction: row; justify-content: space-around; height: 120rpx; border-radius: 60rpx; box-shadow: 0 4rpx 20rpx rgba(0, 0, 0, 0.1); background: rgba(255, 255, 255, 0.4); } .tab-bar-item { display: flex; flex-direction: column; align-items: center; justify-content: center; padding: 15rpx 40rpx; } .tab-bar-icon { width: 44rpx; height: 44rpx; margin-bottom: 8rpx; } .tab-bar-text { font-size: 24rpx; } </style>官方示例 说明: 单次只加载一个页面 加载成功后使用v-show控制显示/隐藏,不重复加载(官方使用CSS属性visibility控制,测试不行) 优点:分页加载,减小单次加载压力(如果页面DOM多的话) 演示代码 <template> <!-- 页面内容区域 --> <view style="flex: 1;"> <IndexPage v-if="tabList[0].init" v-show="selectedIndex==0"></IndexPage> <MorePage v-if="tabList[1].init" v-show="selectedIndex==1"></MorePage> <MorePage v-if="tabList[2].init" v-show="selectedIndex==2"></MorePage> </view> <!-- tabber区域 --> <view class="tab-bar-container"> <view v-for="(item, index) in tabList" class="tab-bar-item" @click="switchTab(index)"> <image class="tab-bar-icon" :src="(selectedIndex === index ? item.s_icon : item.icon)"></image> <text class="tab-bar-text" :style="'color:' + (selectedIndex === index ? '#F59E0B' : '#999999') +';'">{{ item.name }}</text> </view> </view> </template> <script setup lang="uts"> // 导入页面 import IndexPage from "./tabbar/index.uvue" import MorePage from "./tabbar/more.uvue" import UserPage from "./tabbar/user.uvue" // tabbar接口类型 type TabInfo = { init: boolean, name : string, icon : string, s_icon : string } // 页面列表 const tabList = reactive<TabInfo[]>([ { init: true, name: "首页", icon: "/static/tabbar/home.png", s_icon: "/static/tabbar/home_selected.png" }, { init: false, name: "更多", icon: "/static/tabbar/more.png", s_icon: "/static/tabbar/more_selected.png" }, { init: false, name: "我的", icon: "/static/tabbar/user.png", s_icon: "/static/tabbar/user_selected.png" } ]) // 选中的页面 const selectedIndex = ref<number>(0) // 页面切换 const switchTab = (index : number) => { if (selectedIndex.value === index) return if (!tabList[index].init) { tabList[index].init = true } selectedIndex.value = index } </script> <style lang="scss"> .tab-bar-container { position: fixed; bottom: 60rpx; width: 80%; left: 10%; z-index: 999; display: flex; flex-direction: row; justify-content: space-around; height: 120rpx; border-radius: 60rpx; box-shadow: 0 4rpx 20rpx rgba(0, 0, 0, 0.1); background: rgba(255, 255, 255, 0.4); } .tab-bar-item { display: flex; flex-direction: column; align-items: center; justify-content: center; padding: 15rpx 40rpx; } .tab-bar-icon { width: 44rpx; height: 44rpx; margin-bottom: 8rpx; } .tab-bar-text { font-size: 24rpx; } </style>其他方法 使用share-element组件实现 复制官方代码,偶先切换页面组件闪动问题。官方uniapp-xapp的demo测试正常,不知道申明原因。 使用components组件+share-element组件实现的tabbar组件实现,tabbar组件会出现与页面移入方向反向滑动的动画 share-element文档 静态资源 tabbar图标(png) 下载地址:https://www.khkj6.com/usr/uploads/2025/08/2337268233.zip 提取码: